Configure MySQL to allow local connections
When installing a web server, it is necessary to configure the mysql daemon to allow connections from the localhost for certain predefined users, with or without a specific password.
An interactive interface to the database manager like phpMyAdmin can be of much assistance in that.
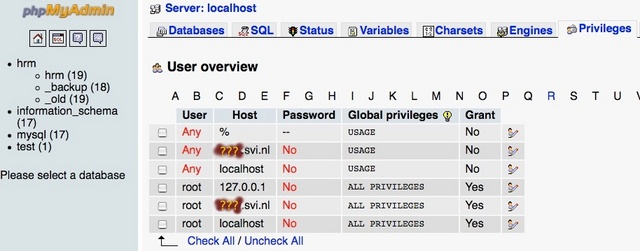
In a test configuration, for example, you can tune the mySql permissions to the following values, through the privileges window of phpMyAdmin:

(The yellow question marks stand for the name of your server).
If you are installing HRM you have to set the correspondent values aslo in the HRM configuration file, so that HRM can connect to the database as user 'root'.
 // The name of the database used by HRM
$db_name = "hrm";

// The name of the user with which the database is accessed
$db_user = "root";

// The password of the account with which the database is accessed
$db_password = "";
(Empty password, thus). Highly insecure, but good enough for this test. You can try setting something more secure:
What you can do is to give a password to root (option A below) or even better create a mysql user and assign a password to it (option B).
This can be achieved with the interactive tool shown above; what follows are the command line instructions for manual configuration from a shell.
(A) To assign a password to root
Make sure the mysql server is running. For that, fire up a shell, and start the mysqld daemon, as root, with something like (this is for Mandriva Linux):
# /etc/init.d/mysqld start
Then type:
# /usr/bin/mysqladmin -u root password 'your_password_here'
(B) To create a new user
You should login to the mysql server as root and create the user.
Make sure the mysql server is running. For that, fire up a shell and start the mysqld daemon, as root, with something like:
# /etc/init.d/mysqld start
Then login:
# mysql -h localhost -u root -p
This assumes the root user already has a password, otherwise just drop the -p flag
Enter password: ********
Now you can create a user like this:
mysql> CREATE USER 'hrm_user'@'localhost' IDENTIFIED BY 'your_password_here';
mysql> GRANT ALL PRIVILEGES ON *.* TO 'hrm_user'@'localhost' WITH GRANT OPTION;
This gives full power to the newly created user 'hrm_user', and you might want to change this.
Do not forget then to set the username and password in the HRM configuration file:
$db_user = "hrm_user";
$db_password = "your_password_here";
