
This page documentation is not up-to-date. Please use the link below to be forwarded to the latest documentation
Huygens Remote Manager Help
Table of contents
- Huygens Remote Manager Help
- Account
- Advanced Spherical Aberration Correction Options
- Calculate pixel size
- Parameter Settings - Step 1: PSF and number of channels
- Parameter Settings - Step 2: Optics
- Parameter Settings - Step 3: Captor
- Size of the unitary CCD captor
- C-mount
- Parameter Settings - Step 4: STED Parameters
- Result comparison
- Enable depth-dependent PSF correction
- Correction of spherical aberration
- File manager
- Home page
- Login
- Queue
- Registration
- Task restoration parameters
- Result images
- Spherical aberration correction mode
- Select PSF files
- Step 1 - Select Images
- Step 2 - Select Parameter Setting
- Step 3 - Select Task Settings
- Step 4 - Create Job
- Number of channels
- Registration
- Image Geometry
- SNR estimator
- Specify Sample Orientation
- Statistics
- System Summary
- Tube factor
- Database update
- User management
Account
Here you can change the email address and password associated to your account. Please notice that the administrator can only change the password.
-
Advanced Spherical Aberration Correction Options
Versions of Huygens Core older than 3.3.2 support two advanced correction modes: (1) 'Deconvolution with PSF generated at user-dependent depth' and (2) 'Depth-dependent correction performed on few bricks'. As of Huygens Core 3.3.2 there is a third one: (3) 'Depth-dependent correction performed slice by slice'.
Method (1) uses a static PSF but created at a certain depth (i.e. distance from the coverslip) specified by the user (in the 'Please enter depth for PSF generation (um)' input field). Altough the PSF remains constant during deconvolution, there is a correction performed at creation time as a function of the distance from the coverslip.
Automatic correction with very large refractive index mismatch can result in Huygens Core breaking down the dataset into a large number of small subvolumes ('bricks'). Artifacts (and a runtime penalty) might appear with increasing number of bricks. Method (2) forces Huygens Core to use fewer bricks than it would in automatic mode.
Method (3), in contrast, forces Huygens Core to deconvolve the dataset one slice at a time.
-
Calculate pixel size
This tool allows you to calculate the pixel size (in the image domain) from the physical size of the ccd chip and the optical parameters.
The requested parameters are discussed in the following help pages.
- Huygens Remote Manager Help CCD
- Pixel Binning
- Huygens Remote Manager Help CMount
- Huygens Remote Manager Help Tube Factor
-
Parameter Settings - Step 1: PSF and number of channels
In this page, you have to specify whether you want to use a theoretical or measured PSF and the number of channels to be deconvolved.
For a more detailed help and description of the parameters, see the following help pages.
- Number Of Channels
- Point Spread Function: here, the user has to choose whether he wants to use a Theoretical Psf or a Experimental Psf for deconvolution. Please follow the Point Spread Function link to have a general introduction on what a PSF is.
-
Parameter Settings - Step 2: Optics
In this page, you have to specify the parameters used to set up the optics of your microscope.
For a more detailed help and description of the parameters, see the following help pages.
-
Parameter Settings - Step 3: Captor
In this page, you are asked to set specify the captor's parameters.
For a more detailed help and description of the parameters, see the following help pages.
-
Size of the unitary CCD captor
The size of the ccd captor elements is a property of the camera used.
The image sensor employed by most digital cameras is a charge coupled device (CCD). The CCD is a collection of tiny light-sensitive diodes, which convert photons (light) into electrons (electrical charge). These diodes are called photosites. Each photosite is sensitive to light — the brighter the light that hits a single photosite, the greater the electrical charge that will accumulate at that site.
-
C-mount
The c-mount is the adaptor with which the camera or captor is attached to the microscope. The c-mount might contain an additional optic that changes the overall magnification. Therefore you have to enter the factor by which the c-mount changes the magnification. If the c-mount doesn't contain an optic the magnification isn't modified and the factor is therefore 1.
-
Parameter Settings - Step 4: STED Parameters
STED depletion mode - This mode determines the type of STED depletion that is being used. You can set this to Pulsed, CW non-gated detection, or CW gated detection.
STED Saturation factor - The saturation factor (ς) is a factor describing the amount by which the fluorescence is suppressed by the STED beam. The higher this factor, the more suppression of fluorescence away from the optical axis, the more resolution. At values below 1 hardly any resolution is gained. Typical values are in the range of 10 to 50. For more details see this publication from the group of Prof. Stefan Hell.
STED wavelength - Enter here the wavelength of the STED depletion laser in nanometers.
STED Immunity fraction - This is the fraction of fluorescent molecules that is immune (photoresistant) to the depletion beam. The value that should be entered here is usually between 0% and 10%, and should be estimated with the use of the Huygens PSF distiller using STED bead images.
-
Result comparison
If the system administrator allows the usage of automatically generated previews, you should get a link with the success notification email that takes you to a comparison of the original with the restored result.
In this window, different visualization modes enabled by the administrator are available. You can compare the datasets in
- MIP view
- top-view SFP view
- embedded stack browser (slicer)
- stack animation (AVI) of the restored image to download
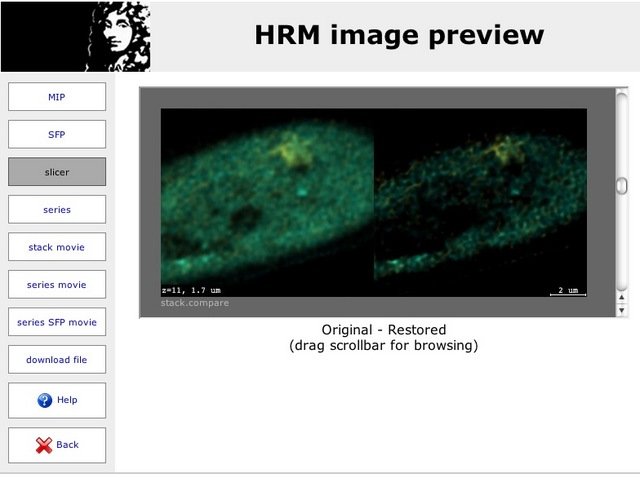
Time series can also show an embedded time browser and an AVI animation to download.
From this image preview window you can also download the restored files and the previews, if the administrator allows http downloads in the configuration.
-
Enable depth-dependent PSF correction
The Huygens Software can adapt the theoretical Point Spread Function (PSF) to the sample depth to (partially) correct for spherical aberration while doing deconvolution if a mismatch in the refractive indices is present. In case of such a mismatch, HRM will let the user decide whether a correction should be performed or not.
If the user answers 'No', HRM will create a static PSF at the coverslip (z = 0) and use it for deconvolution: no depth-dependent correction will be performed. The PSF will be assumed to stay perfectly preserved at any distance from the coverslip.
If the user instead chooses 'Yes', additional options for correction will be presented.
-
Correction of spherical aberration
Spherical Aberration (SA) is introduced in the imaging system among other possible reasons by a Refractive Index Mismatch. Such a mismatch distorts the PSF, causing that the real PSF varies from plane to plane in a continuous way.
The Huygens Software can adapt the theoretical Point Spread Function (PSF) to the sample depth to (partially) correct for spherical aberration while doing deconvolution if such a mismatch is present. In the HRM, you can also specify a depth at which a fixed PSF will be calculated, not using a variant PSF but a distorted one at a certain depth.
Geometry
To make the depth correction of the theoretical PSF, the program needs to know the location of the coverslip in the image: is it placed at the bottom of the image, at lower Z coordinates (as in an inverted microscope), or at the top of it? (The asymmetries in the PSF distortion depend on the optical orientation of the image).
If you are not sure of what is the orientation of your dataset you can always guess it from the asymmetry of the PSF by looking laterally (in a XZ view, for example) at the shape of the cones of light. See Mismatch Distorts Psf.
Should I use the correction?
If your microscope is well aligned and its PSF fits the ideal models quite well, you can use a Theoretical Psf safely. This can make use of a depth-dependent PSF to correct for SA.
If the Experimental Psf is far away from being good (i.e. it is very dissimilar to the theoretical one in size or symmetry) then better use this one. It will take into account all the microscope misalignments, and to correct for that may be more important than the SA correction. If your sample is not very thick, a depth-independent experimental PSF will do it as well.
You can use the PSF generator in the Nyquist Calculator to simulate spherical aberration conditions at different depths inside the sample, and compare the results with your experimental PSF.
Air lenses
Air lenses require special consideration: they may be corrected for spherical aberration and they may behave as, e.g., glycerine lenses, and therefore you will not expect problems if you use glycerol as embedding medium. You can then think about deactivating the SA correction as explained in the previous paragraph. Still a Fishtank Effect may be present that will make things difficult. Read more in Air Lens Correction.
-
File manager
The file manager allows the uploading of raw data files and the downloading of deconvolved data files to and from the file server. Multiple-file upload and download is possible. Moreover, compressed files can be uploaded: the HRM will take care of unpacking the archives maintaining the directory structure contained in the archive.
The navigation bar allows to switch from the "Originals" view, where the raw data files are listed, to the "Results" view, where the deconvolved data files are shown.
Clicking on a file in the image list will show a preview. If the preview does not yet exist, one can easily be generated on the fly (please mind that preview generation from the web interface must be activated in the HRM configuration file). In the results mode, an "Expanded view" link will show a comparison between the raw and the deconvolved datasets: various visualization modes are possible, e.g. AVI movies for time series and along the z axis for 3D datasets, and SFP renderings instead of MIPs. All options are configurable.
Original files
The files stored in the source directory on the file server are listed here. New files can be uploaded and existing files can be deleted. Multiple files (also archived) can be uploaded. Clicking on a file name in the list will show a preview.
Result files
The restored files stored in the destination directory on the file server are listed here. One of more files (use CTRL- or SHIFT-click for multiple selections) can be downloaded and existing files can be deleted. Clicking on a file name in the list will show a preview and a link over the preview itself will reveal an extended comparison between raw and restored data.
-
Home page
The home page is the new entry point (as of version 1.2.0) of the Huygens Remote Manager that collects all actions in a nice layout.
-
Login
How to login with an existing account
If you already have an account, enter your user Name and Password in the Login dialog and press the "login" button. For security reasons the password is not shown while you type. If you misspell your name or the password and press "login" a message will appear stating that this account doesn't exist: in this case just try again. Be aware that the name and the password are case sensitive, e.g. pierre and Pierre are different names.
How to get an account
This is only valid if the embedded HRM user management is in use. If authentication is performed against Active Directory or OpenLDAP, then user accounts cannot be requested through the HRM.
If you don't have an account yet, click on the please register <here> link in the Login dialog. You will be brought to the Huygens Remote Manager Help Registration Page, where you can request an account.
-
Queue
This page displays the queue of jobs currently being processed. The view is auto-refreshed every 10 seconds. You can force a refresh by pressing the "Update view" button.
You can delete jobs owned by you.
-
Registration
This page allows a new user to request an account. All entries besides the "Request message" are mandatory. Clicking the "register" button will not automatically generate an account: the request will be sent to the administrator for approval. An email will then inform the user as soon as the account has been activated or rejected.
After account activation, the user can login with the chosen user name and password.
-
Task restoration parameters
The restoration takes five parameters:
- The deconvolution algorithm
- the Signal To Noise Ratio
- the Background Mode
- Automatic background estimation: this is the 'lowest-value' mode
- In/near object
- Remove constant absolute values per channel, as entered by the user.
- the Max Num Of Iterations
- the Quality Criterion
The Signal To Noise Ratio and the stopping criteria fields can accept several values (separated by a blank space): this can be used to run a series of jobs with varying parameters.
-
Result images
This subpage of the queue manager displays a list of the files currently available in your destination directory.
Update view
If files keep being added to your result directory by the queue manager, they won't be shown until you press the Update View button to let HRM rescan your area and refresh the file list.
HTTP download
If the HTTP file transfer is enabled by the administrator, you can also select some files and download them. You can use shift+click and control+click to select multiple images. Press the arrow down button to start the actual downloading.
The selected files will be added to a compressed archive for easy downloading. Mind that if the selected files are large or many, this operation can take a while.
-
Spherical aberration correction mode
Choosing 'Perform automatic correction' will tell Huygens to estimate and use the parameters to perform depth-dependent spherical aberration correction automatically. Especially in case of very large refractive index mismatches between the refractive index of the lens immersion medium and specimen embedding medium, however, artifacts might become visible and require an advanced correction mode.
-
Select PSF files
The dialog allows you to select a PSF file in ICS format for each channel. Please notice that only single-channel PSF files are currently supported. If your raw image is Multi Channel, you should have a separate single-channel PSF for each channel you want to deconvolve.
-
Step 1 - Select Images
Adding images to the job
Here you can select the images you want to process. The "available images on server" field lists all images present in your area on the file server that match the file type set in current parameter settings. You can use shift+click and control+click to select multiple images. Press the arrow down button to add the images to the "selected images". You can remove images from your selection in the same way using the arrow up button.
Update view
If you add images onto the file server after you reached the image selection page, they won't be shown until you press the Update View button to let HRM rescan your area and refresh the file list.
-
Step 2 - Select Parameter Setting
You can create parameter settings containing the image format, the microscope parameters and the captor parameters used for your images. A setting is stored under a name and can be reused later.
How to use an existing setting
To use an existing setting select it in the "your parameter settings" list by clicking on its name. The selected setting will be highlighted in the list. Press the forward icon to go to the next step.
Template settings prepared by your administrator can be copied from the "template parameter settings" list into "your parameter settings". Select one setting in the upper list and click on the green arrow to copy it into your settings.
If you are using the Huygens Remote Manager for the first time or if you want to process images created with settings different from those you used before, you will have to create a new setting.
How to create a new setting
- Enter the name of the new setting. The name must be different from the names of already existing settings. Besides of this you can use any name you like. It is best to choose a name that helps you to remember what the settings were made for, e.g. it is better to use the name of the microscope used than to use your family name.
- Press the "Create" button. You will be led through three pages where you must enter different kinds of parameters. The setting will be saved when you push the forward button on the third page.
How to copy a setting
If you want to create a setting that is similar to an existing setting you can copy the setting and change the parameters you want afterwards.
- Select the setting you want to copy in the list. The selected setting will be highlighted.
- Enter a name in the field "new/clone setting name".
- Press the "Copy" button.
The new setting will be shown under the name you entered in the list. It will contain the same parameter values as the setting that you copied.
How to edit a setting
If you made mistake when you created a setting or if you just want to change a parameter you can edit a setting.
- Select the setting you want to edit in the list. The selected setting will be highlighted.
- Press the "Edit" button.
Editing is carried out in the same way as the creation of a new setting. You will be led through the three pages again where you can change the parameter values you like. If there are pages where you don't want to change any value just press the forward button to go to the next page. The edited setting will be saved when you push the forward button on the third page. After you did that you will be returned to the "select parameter setting" page.
How to make a setting default
If you use only one setting or if you use multiple settings but one of them more often than the others you can make this setting the default setting. The default setting will be preselected when you use the Huygens Remote Manager the next time.
- Select the setting in the list. The selected setting will be highlighted.
- Press the "Default" button.
The name of the default setting will be displayed in a color different from those of the other settings when it is not selected.
How to delete a setting
If you are sure that you don't need a setting any more you can delete it.
- Select the setting in the list. The selected setting will be highlighted.
- Press the "Delete" button.
Be careful: the setting will be deleted immediately without any further questions. Once it is deleted its name will disappear from the list. A deleted setting can not be restored any more. If you deleted a setting accidentally the only way to get it back is to create a new setting and enter all values again. If you already used the setting before you can look for the parameter values in the summary email you received from Huygens Remote Manager when you ran the job.
-
Step 3 - Select Task Settings
You can create task settings containing the operations that will be executed on the images together with parameters these operations need. A setting is stored under a name and can be reused later.
How to use an existing setting
To use an existing setting select it in the "your parameter settings" list by clicking on its name. The selected setting will be highlighted in the list. Press the forward icon to go to the next step.
Template settings prepared by your administrator can be copied from the "template parameter settings" list into "your parameter settings". Select one setting in the upper list and click on the green arrow to copy it into your settings.
If you are using the Huygens Remote Manager for the first time or if you want to process images created with settings different from those you used before, you will have to create a new setting.
How to create a new setting
- Enter the name of the new setting. The name must be different from the names of already existing settings. Besides of this you can use any name you like. It is best to choose a name that helps you to remember what the settings were made for.
- Press the "Create" button. You will be led through three pages where you must enter different kinds of parameters. The setting will be saved when you push the forward button on the third page.
How to copy a setting
If you want to create a setting that is similar to an existing setting you can copy the setting and change the parameters you want afterwards.
- Select the setting you want to copy in the list. The selected setting will be highlighted.
- Enter a name in the field "new/clone setting name".
- Press the "Copy" button.
The new setting will be shown under the name you entered in the list. It will contain the same parameter values as the setting that you copied.
How to edit a setting
If you made mistake when you created a setting or if you just want to change a parameter you can edit a setting.
- Select the setting you want to edit in the list. The selected setting will be highlighted.
- Press the "Edit" button.
Editing is carried out in the same way as the creation of a new setting. You will be shown the parameter page again where you can change the parameter values you like. After you have done that you will be returned to the Select Task Setting page.
How to make a setting default
If you use only one setting or if you use multiple settings but one of them more often than the others you can make this setting the default setting. The default setting will be preselected when you use the Huygens Remote Manager the next time.
- Select the setting in the list. The selected setting will be highlighted.
- Press the "Default" button.
The name of the default setting will be displayed in a color different from those of the other settings when it is not selected.
How to delete a setting
If you are sure that you don't need a setting any more you can delete it.
- Select the setting in the list. The selected setting will be highlighted.
- Press the "Delete" button.
Be careful: the setting will be deleted immediately without any further questions. Once it is deleted its name will disappear from the list. A deleted setting can not be restored any more. If you deleted a setting accidentally the only way to get it back is to create a new setting and enter all values again. If you already used the setting before you can look for the parameter values in the summary email you received from the Huygens Remote Manager when you ran the job.
-
Step 4 - Create Job
This page summarizes the selections you made, lets you select the output file format and allows you to start the job.
Output file format
- 8 bit TIFF (Tagged Image File Format): the color depth is converted to 8 bit before saving. For time series and volume images multiple files with the same name followed by a numerical index are saved.
- 16 bit TIFF (Tagged Image File Format): the color depth is converted to 16 bit before saving. For time series and volume images multiple files with the same name followed by a numerical index are saved.
- IMS classic (Imaris classic): the color depth is converted to 8 bit before saving. The IMS classis format stores any tipe of geometry in one file.
- (default) ICS (Image Cytometry Standard): full precision, no conversion is performed before saving. Two files are written for all possible geometries, one containing the pixel data (.ids), the other containing the associated metadata (.ics).
- OME-XML (see OMEfileFormat)
Parameter settings
Review the parameter settings. If you want to change them before creating the job use the link "parameter setting". The link takes you back the "Parameter Setting Selection" page, where you can select another setting or edit the current setting.
Task settings
Review the task settings. If you want to change them before creating the job use the link "task setting". The link takes you back the "Task Setting Selection" page, where you can select another setting or edit the current setting.
Selected images
The images that will be processed are listed. If you want to change the selection use the link "selected images". The link takes you back to the "Select images" page.
Create job
After you checked the parameters you can create the jobs by pressing the pink forward button. You can check the progress of the processing of your jobs by clicking at the "queue" link at the top of the page.
You will receive an email whenever one of your jobs is finished. The result images are written into your output area on the file server.
-
Number of channels
In a Multi Channel 3D image, this Microscopic Parameter describes the number of channels present in the image.
-
Registration
This page allows a new user to request an account. All entries besides the "Request message" are mandatory. Clicking the "register" button will not automatically generate an account: the request will be sent to the administrator for approval. An email will then inform the user as soon as the account has been activated or rejected. After account activation, the user can login with the chosen user name and password.
-
Image Geometry
The Huygens Software is capable of reading and writing different microscopy image File Formats. Several of these formats (like Metamorph .stk, or Zeiss .lsm) support data of different geometries.
While the Huygens Software can retrieve the information about the image geometry automatically from the files upon reading, if deconvolution jobs are started through the Huygens Remote Manager then this information must be explicitly provided.
The supported geometry configurations are:
- XY → This option is not explicitly listed and is active only when an image format with "single XY plane" descriptor is selected.
- XYZ → The file contains a volumetric 3D stack.
- XY - time → The file contains a time series of 2D (XY) images.
- XYZ - time → The file contains a time series of volumetric 3D (XYZ) stacks.
-
SNR estimator
Since version 1.2 of HRM, together with version 3.5.1 of Huygens Core, a Signal To Noise Ratio estimator is available that will return suggested Signal-to-Noise ratio (SNR or S/N) values, based on a representative image, to fill out the Restoration Task Settings form.
Using the estimator in HRM
The SNR estimator in HRM will return reasonable starting values for the type of images you want to deconvolve. You can further tune this SNR value by comparing the corresponding deconvolution results, to adapt the restoration to the experimental needs.
The estimator works by letting you select a raw image, among the ones present at your directory in the HRM server, and automatically inspecting the level of noise in its different channels. A best-guess will be returned per channel, that you can write down and enter in the restoration task settings. (Values will not be entered automatically in the form).
It is important to select an image for the estimation that is representative of the kind of images you want to deconvolve later, if you plan to run multiple jobs with the same settings.
Please notice that each channel may have a different noise level.
Graphical output
Together with the best estimate, the HRM will return a collection of images (small portions of the whole dataset), simulations of how the raw data would have looked had the SNR been different during the acquisition. These images can be compared with the original data to visually confirm the correctness of the estimate.
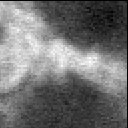
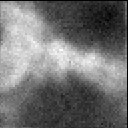
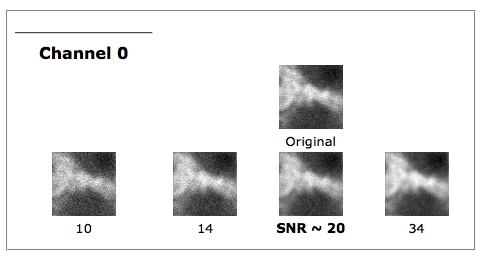 By hovering your mouse pointer over the images, you get a zoomed image with which you can better see the granularity of the image, caused by the different noise levels. The texture of the image with the best SNR value should be the most similar to the original dataset:


Notice that these are just simulations of how the raw data would have looked with different noise levels, they are not deconvolution results. To see how the different SNR parameters affect the quality of the result, you have to use them in deconvolving the dataset.
(Tip: move your mouse from left to right over the simulations for one channel to make the zoomed image change rapidly: you'll see it as an animation of varying noise!!!)
Difficulties during the estimation
Please notice that Under Sampled images will provide wrong SNR estimations. Undersampling will make deconvolution fail anyway, so in this case it is not so important that the SNR is not so correctly estimated. It is highly advised to acquire your images as close to the Ideal Sampling as possible.
The estimator will try to avoid regions of the image where clipping occurs, as this can also generate bad SNR estimations. But if the image is severely clipped in its more interesting regions, the tool may not provide a meaningful result. Again, this is less important than the fact that deconvolution will fail with Clipped Images.
Effects of the SNR parameter
The SNR is used in the Huygens Software as a Regularization Parameter, i.e. as a parameter that controls the sharpness of the restoration result. The higher this value, the sharper your restored image will be.
Therefore you should not think of the SNR as a parameter describing your original image, but as a tunable parameter that controls the deconvolved result, like the 'number of iterations' does.
One can only afford using very high SNR values, that will produce sharper results, when the raw data is noise free and smooth. Using a too large SNR value might be risky when restoring noisy originals, because you could be just enhancing the noise.
A noise-free widefield image usually has SNR values higher than 50. A noisy confocal image can have values lower than 20.
For more details about this parameter, see SNR.
-
Specify Sample Orientation
For depth-dependent correction to work properly, the relative position of the coverslip with respect to the first acquired plane of the dataset has to be specified. Is the coverslip placed at the bottom of the dataset, i.e. at lower Z coordinates (as in an inverted microscope), or at the top? See also here for additional details.
-
Statistics
This page generates several graphical and tabular views of the stored statistics.
While the administrator has full access to statistical data associated to any (completed) deconvolution jobs and can even download the whole statistics table from the HRM database to a text file for further processing (e.g. in some spreadsheet software), normal HRM users are only granted access to the statistical data associated to jobs launched by them.
-
System Summary
This page displays relevant information about your HRM installation; in particular
- the HRM and Huygens software versions;
- operating system type and kernel version;
- web server, database and PHP versions;
- several important PHP configuration values.
In addition, it optionally shows a parsed version of the complete php information returned by phpinfo().
-
Tube factor
The magnification is dependent on the tube length of the microscope, with most objectives and eyepieces having optical properties designed for a specific, fixed length. Variation to the length may lead to changes in the magnification factor, and although additional lenses can be used to compensate, this in turn will introduce a magnification factor that must be taken into account (known as a tube factor usually in the region of 1.25-1.5x). On some microscopes the tube factor can be adjusted using a wheel with the different possible tube factors written on it.
-
Database update
This tool allows you to update a database created with an earlier version of the HRM to the revision supported by the currently installed version. Since this might change both the structure and the content of your database, please make sure to perform a backup before you click on 'database update'.
-
User management
This page allows the administrator of Huygens Remote Manager to perform maintenance on the user data base.
Registrations
The registration field lists the pending account request. The administrator can either accept or reject them.
Existing users
The existing users are listed here. Users can be filtered by clicking on any of the letters. Alternatively, all users can be visualized by clicking on "all".
New users can be created by the administrator by clicking on "add new user". An user added by the administrator is automatically accepted.
Clicking on "distribution list" allows the administrator to send an email to all registered users.
Each user can be edited, enabled/disabled, or even deleted by the administrator by clicking on the corresponding buttons next to the user name.
Moreover, all users can be enabled/disabled with one click.